How to fix Destiny 2 ‘Servers Are Not Available’ Error?
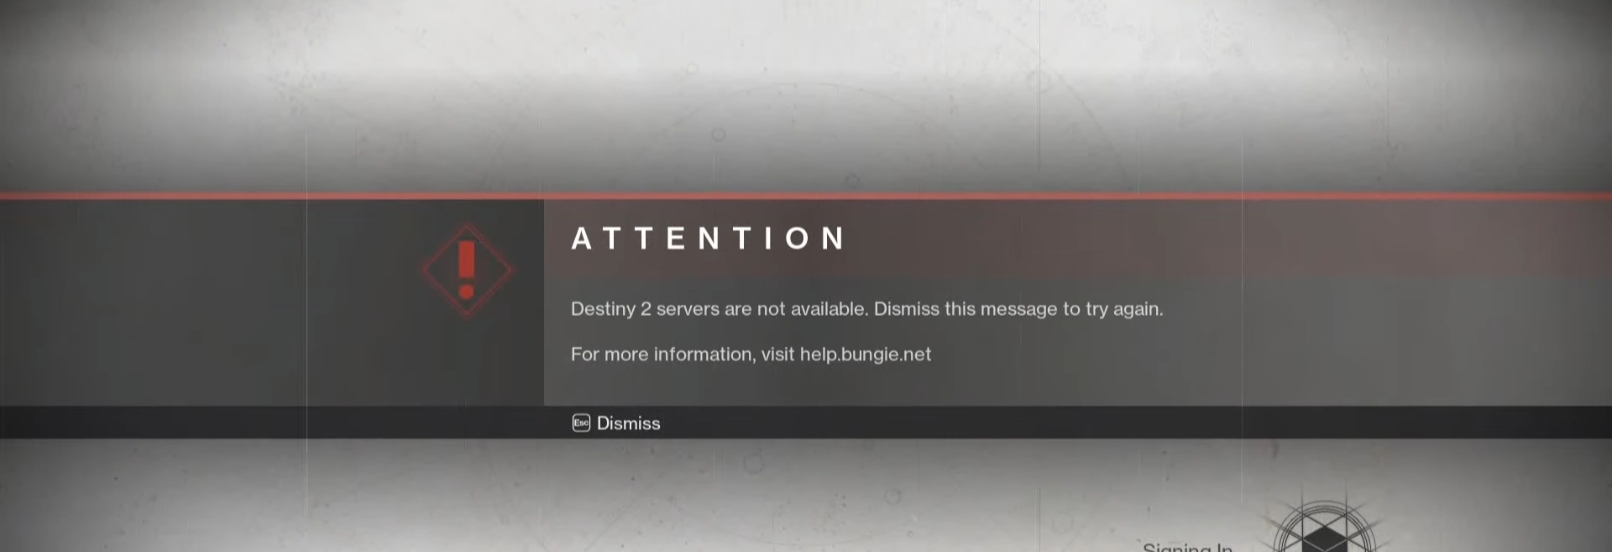
In this tutorial, we will learn about How to fix Destiny 2 ‘Servers Are Not Available’ Error?. The “Servers Are Not Available” error in Destiny 2 is a message indicating that players are unable to connect to the game’s servers. This error can disrupt gameplay and prevent access to various online features. It’s important to understand that this issue typically arises when there are problems on either the player’s end or the game server’s end.
When encountered, this error can be quite frustrating for players. To address it, you need to take several steps to troubleshoot and potentially resolve the issue. Here’s a step-by-step guide on how to fix this error:
Causes of Destiny 2 ‘Servers Are Not Available’ Error
In most cases, this error happens because Bungie’s servers are having a temporary problem. You can wait a bit and check their official channels for updates. But if it keeps happening, try fixing your internet connection, change settings, or ask Bungie or your platform’s support for help.
Server Outages: The most common cause is server maintenance or server outages on the part of Bungie, the developer of Destiny 2. During maintenance periods or when servers are experiencing issues, you may encounter this error.
Network Issues: Problems with your internet connection, such as slow or unstable connections, can also lead to this error. Destiny 2 requires a stable and reliable internet connection to connect to its servers.
Firewall or Antivirus Settings: Sometimes, firewall or antivirus settings on your computer can block the game from connecting to the servers. Adjusting these settings may be necessary to resolve the issue.
Router or Modem Problems: Issues with your router or modem, such as port restrictions or a need for a reset. It can affect your ability to connect to Destiny 2 servers.
Platform Service Issues: The error can also occur if there are problems with the online services of the gaming platform. By using (e.g., PlayStation Network, Xbox Live, Steam) that Destiny 2 relies on for online play.
Game Updates: If the game is outdated or hasn’t been updated to the latest version, it may not be able to connect to the servers properly.
Fix Destiny 2 Error
Fix 1 : Refresh your Internet Connection
Online games can sometimes grind to a halt due to random internet connectivity issues. Slow internet speeds, sporadic connections, or even a complete lack of internet can be the culprits. To tackle these problems, the first step is to refresh your computer’s internet connection.
Restart Your Router or Modem: Begin by turning off your router or modem. Wait for approximately 30 seconds, and then power it back on. This simple action can refresh your connection and often resolves connectivity issues.
Switch to a Wired Connection: Whenever possible, connect your gaming console or PC directly to your router using an Ethernet cable. Wired connections are generally more stable than Wi-Fi for online gaming.
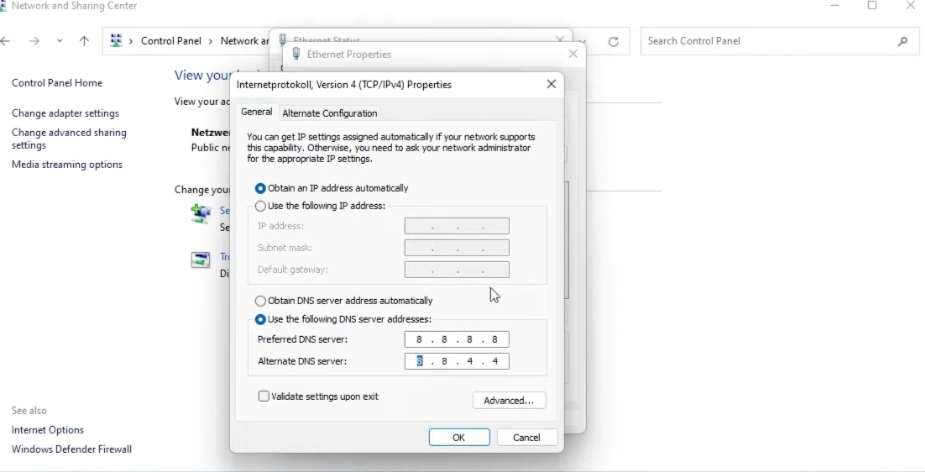
Fix 2 : Disable DHCP on your computer
To address the Destiny 2 server error, you can disable DHCP on your computer –
Access Network Settings:
First, access your computer’s network settings.
Open Network and Sharing Center:
Open the Network and Sharing Center from the Control Panel or the system tray.
Change Adapter Settings:
Click on “Change adapter settings” on the left sidebar.
Choose Your Network Connection:
Right-click on your active network connection and select “Properties.”
Select Internet Protocol Version 4 (TCP/IPv4):
In the connection properties window, scroll down and locate “Internet Protocol Version 4 (TCP/IPv4).” Highlight it and click on “Properties.”
Manually Set IP Address:
In the next window, select “Use the following IP address” instead of obtaining an IP address automatically.
Enter IP Address and DNS Servers:
Enter a valid IP address, subnet mask, default gateway, and DNS server addresses. You can obtain this information from your router or network administrator.
Save Changes:
Click “OK” to save the changes and close all the open windows.
Restart Your Computer:
Restart your computer to apply the new network settings.
Launch Destiny 2:
Once your computer has restarted, launch Destiny 2 and check if the server error is resolved.
Keep in mind that adjusting network settings manually should be approached carefully. Typically, it’s advisable to stick with DHCP for automatic setup unless you have a particular need for a static IP address. Be sure you’ve got the accurate network configuration details on hand before proceeding because getting these settings wrong can cause connectivity problems.
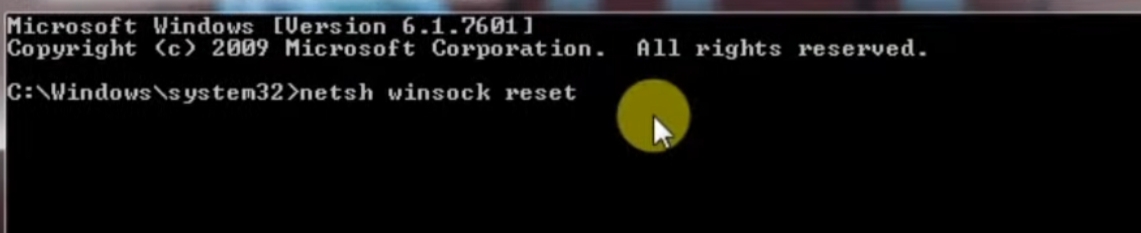
Fix 3 : Reset the TCP/IP address on your computer
To resolve the Destiny 2 server error, try resetting the TCP/IP address on your computer –
Press Windows Key + X to open the Power User Menu.
Select Command Prompt (Admin) or Windows PowerShell (Admin) from the menu.
In the Command Prompt window, type the following commands one by one and press Enter after each:
netsh winsock reset
netsh int ip reset
After running these commands, restart your computer.
This action can help refresh your network settings and potentially resolve connectivity issues with Destiny 2’s server.
Fix 4 : Updating your Network driver
Updating your network driver can improve network stability and compatibility, potentially resolving connectivity issues with Destiny 2. If the error persists, you may want to explore other troubleshooting steps, such as checking your internet connection or verifying the status of Destiny 2’s servers.
To update your network driver and potentially resolve the Destiny 2 server error, follow these steps:
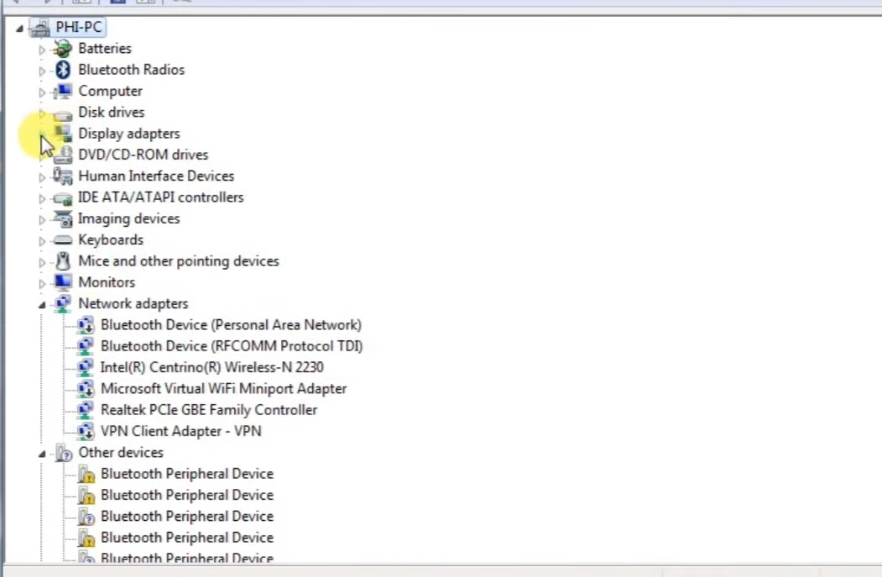
Access Device Manager:
First, open the “Device Manager” on your computer. You can do this by right-clicking on the “Start” button and selecting “Device Manager” from the menu.
Locate Network Adapters:
In the Device Manager window, look for the category labeled “Network Adapters.” Click to expand it.
Identify Your Network Adapter:
You’ll see a list of network adapters. Find the one that corresponds to your network card or Wi-Fi adapter. It may have a name like “Realtek,” “Intel,” or another manufacturer’s name.
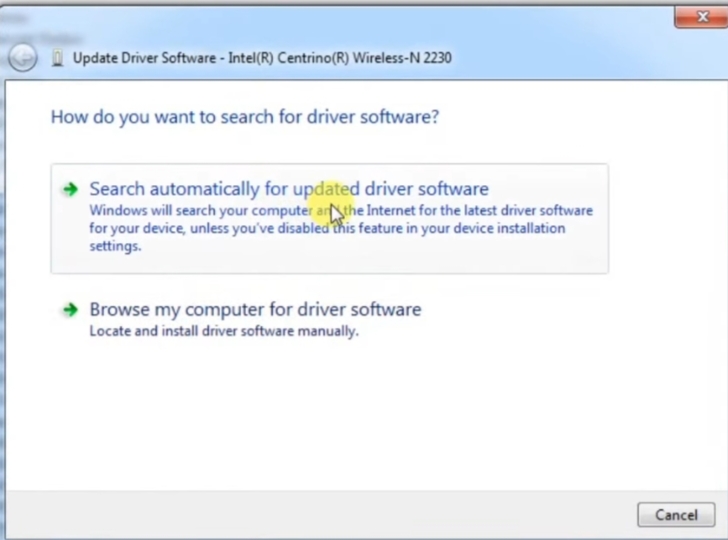
Update the Driver:
Right-click on your network adapter and select “Update driver” from the context menu.
Search Automatically for Updated Driver Software:
Choose the option that says, “Search automatically for updated driver software.” This will instruct Windows to search for the latest driver software online.
Follow On-Screen Instructions:
Windows will then connect to the internet and search for an updated driver. If it finds one, it will prompt you to install it. Follow the on-screen instructions to complete the process.
Restart Your Computer:
After the driver update is complete, it’s a good practice to restart your computer. This ensures that the changes take effect.
Launch Destiny 2:
Once your computer has restarted, launch Destiny 2 and check if the server error is resolved.
Other Solutions
Check Server Status:
Start by checking the official Bungie website or their Twitter account for server status updates. If the servers are down, you may have to wait until they are back up.
Check for Game Updates:
Make sure you have the latest updates and patches for Destiny 2. Outdated game files can lead to connection issues.
Review Firewall and Antivirus Settings:
Check your computer’s firewall and antivirus settings to ensure they are not blocking Destiny 2’s access to the internet. Adjust settings as needed.
Port Forwarding:
Configure port forwarding on your router based on the port information provided by Bungie. This can help establish a better connection to Destiny 2 servers.
Disable VPN or Proxy:
If you’re using a VPN or proxy service, try disabling it. These services can sometimes interfere with online gaming connections.
Clear Cache and Temporary Files:
Clear cache and temporary files on your gaming platform or PC. This can help resolve connectivity issues caused by corrupted files.
Check for Service Alerts:
Verify if there are any service alerts or issues with your gaming platform’s online services (e.g., PlayStation Network, Xbox Live) that may be affecting Destiny 2.
Contact Support:
If none of the above solutions work, consider reaching out to Bungie’s support or the support for your gaming platform (e.g., PlayStation Support, Xbox Support) for further assistance. Provide them with details about the error you’re experiencing.
Fuel Your Passion for Coding: Dive into Our Other Posts